Mostrando entradas con la etiqueta code. Mostrar todas las entradas

12 oct 2016

AIisNotIA - ¿Es un teléfono movil un "arma de guerra"?

Es de rabiosa actualidad en la conciencia global de los usuarios de las máquinas el hecho de que sí, una batería como las que necesitan nuestros aparatejos para funcionar bien puede representar un conato de incendio, especialmente delicado cuando portamos estos aparatos tan cerca de nuestras mas íntimas partes. Y sí, en este caso todos lo vimos. La batería "puede explotar".

Pero sería ingenuo pensar que esto -que ahora aterra a miles de consumidores- no era algo por todos ya conocido...  por todos, o por quien quiera simplemente mirar mas allá de la pura superficie (normalmente comercial) de todo el asunto. Para poder comprender mejor es necesario mirar el panorama desde arriba, y eso solo se hace -en el caso de la cuestión tecnológica- mediante palabras. A ellas me remito.

Podríamos hablar de redes sobre sistemas (de trasmisión de), unos de datos, por el aire o por el cable (¿es pegarse una antena a la cabeza una buena idea?), otros de energía , de uso instantáneo y continuo, o almacenado y recargado... (el eterno dilema de las pilas...), y todo esto esta muy bien y es sin duda un tema apasionante pero... ¿sirve para algo? (...mucho me temo que solo para perder el tiempo, que no es poco). También se les ocurrió incrustar micrófonos y cámaras en todas las máquinas y a mi aún no me parece una cosa de protocolo, vaya.

Un cotocircuito en una batería puede ser muy peligroso pues -como parece que estamos aprendiendo- pueden ser un conato de incendio, cuando no una carga incendiaria en sí misma. A mi me lo explicó un amigo cuando vio esa extraña manía de almacenar pilas y móviles viejos en cestas y cajones...

Un malfuncionamiento de las funciones (programas) que controlan el ciclo de carga de la batería puede ser muy peligroso. Hasta aquí parece ser que algo sabemos. A partir de esta misma linea expongo elucubraciones y pseudodelirios acerca de lo que sí puede estar sucediendo en el campo de la programación de "armas de guerra electrónica" (electronic warefare?){y pido perdón pues el código que se ejecuta en una máquina nunca (por muy inteligente que te digan que es) podrá determinar si es un programa (bienintencionado) o un malware (malinencionado), entre otras porque le dá exactamente igual.}

¿Y sí a alguna mente maquiavélica se le ocurriera la idea de disponer de un determinado "botoncito", por hablar de forma coloquial, que sobrecaliente y en consecuencia pueda generar un incendio en un determinado momento?. ¿y si lo hicieran para todos y cada uno de los modelos que hay en el mercado?... ¿y si encima le ponen nombrecitos tales como ... bueno, ya saben...?

...¿Que nos tienen cojidos por los huevos? Ya, claro. ¡¿y qué?! ...It's not a bug, it's a feature!

17 oct 2015

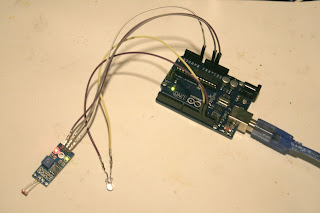
Arduino smart light response system - Basic concepts


Easy and impressive as usual, Arduino boards allow any ignorant such as me myself and I to develop a unique and relatively cheap controller capable of reading the light state surrounding a given sensor and translate it to some command, hereby light a brand new second hand led -that is on or off according to environmental needs-. Simple, fast and closed circuit. Adding a relay is just a matter of time isn't it?


Want to see it in action?. Check out this video of the gadget at work:


Here is the code that runs it. No more, no less:

//     ____                 //
//    /    /___             //
//   /    /    /___         //
//  /____/    /    /____    //
//  |   /____/    /    /|   //
//  |___|   /____/    / |   //
//      |___|   /____/  /   //
//          |___|    | /    //
//              |____|/     //


// ArduLightResponseSystem
// Led on only when the light is out.


int photoRPin = 0; 
int lightLevel;
int LEDpin = 13;


void setup() 
{
 Serial.begin(9600);
}

void loop()
{
 lightLevel=analogRead(photoRPin);

 Serial.println(lightLevel);{       
   
 if(lightLevel > 526)
 {
   digitalWrite(13, HIGH);

 }
 else if(lightLevel <= 526){
 digitalWrite(13, LOW);
 }


 delay(250);

}
}


//......................................................................
// Luis Rodriguez Alonso. October 2015. habitainer@gmail.com
// http://habican.blogspot.com.es/
// publicado bajo GNU GENERAL PUBLIC LICENSE
// https://gnu.org/licenses/gpl-3.0.en.html


Just enjoy it!


22 feb 2015

"Smart" solar water heater - My first Arduino project


Short time ago a friend of mine gave me an Arduino board, a sort of tunable programmer that can suit your needs, relatively low cost and backed up with a community of passionate makers. Electronics for newbies. So this small electronic board came to make my spare time busy. In this video I stand marveled at the stat of the art:


So I decided to try to make reality a basic and simple idea that had been arrounf my head long ago. As it is by everyone well known, a water pipe left to the sun, spetially when black, do tent to heat up the water contained in them, up to temperatures that can burn the skin (when intense radiation conditions are achieved).

The idea would be to actually know when it is suitable to recirculate water from a heat accumulator, know when the pipe would be full of hot water, and know when we can pour cold water to be heated.


For such porpoise was needed:


- Water tank. Better if isolated, but for testing porpoises I wanted it to be with no pressure, that is open air deposit.


- Pipe, better if black, and accessories.


- A water recirculation pump. I am using my good old electric pump that so much weater has been moving around. It fears more staying still (thus rusty) that being operative.


- Two temperature sensor  (I did not get pictures right) and a Relay.


- And nevertheless our Arduino board, wires  -notice I have used conventional network cable RJ45 that allow you to take sensors and relay "just where you need them", and a protoboard usually used to this kind of experiments

Physic connection goes, more or less, as follows:

- Temperature sensors: Both sensors have 5 V line input (the one bringing electricity), an information pin that will be connected to an analog input in order to measure analog readings, and a ground pin that "closes" the electrical flow.

- The Relay: Relay is basicly the same, except that signal will be connected to a digital pin as we will only need to deal with either if is on or off. In my situation relay is normally open (NO). On the other side of it we connect a conventional switch installation governed by the relay. Please excuse there are no pictures but once in its place it was quite hard to make such.

Remark here that I used conventional RJ45 network wire to place the sensors and relay where I needed them to be, and observed to be a simple and effective solution.

And after the code to be loaded in our Arduino board. I simply copypasted code found in references, and last lines "simply came to my mind"... It was very easy to do what I had in mind. Now is on testing stage, to see what it can do, and iI can tune it up. This is that:

//......................................................................
// SOLAR THERMAL ENERGY FOR ALL (S.T.E.F.A. V_0.01)
//......................................................................
// this code allows to activate a relay according to a temperature differential
// the role of this program is to operate a reculation water pumpel
// only when heating conditions are optimal
//......................................................................
int sensorPin1 = 0;
int sensorPin2 = 1;
int Relay = 8;
// we activate both temperature sensor and relay

void setup()
// this code only runs once
{
  Serial.begin(9600);
  // activates "Monitor Serial" in our computer
 
  pinMode(Relay, OUTPUT);
  // defines relay on or off
 
  Serial.println("More sun, more water. Less sun, less water.");
}

void loop()
// this code goes over and over...
{

Serial.println(".....................................");

//......................................................................
// TEMPERATURE SENSOR 1
//......................................................................
int reading1 = analogRead(sensorPin1);
// gets the reading

float voltage1 = reading1 * 5.0;
voltage1 /= 1024.0;
// calculates voltage output

float temperatureC1 = (voltage1 - 0.5) * 100;
// calculates temperature from voltage

Serial.print(temperatureC1); Serial.println(" C degrees...... tank sensor...");
// prints temperature from sensor 1

//......................................................................
// TEMPERATURE SENSOR 2
//......................................................................
int reading2 = analogRead(sensorPin2);
// gets the reading

float voltage2 = reading2 * 5.0;
voltage2 /= 1024.0;
// calculates voltage output

float temperatureC2 = (voltage2 - 0.5) * 100;
// calculates temperature from voltage

Serial.print(temperatureC2); Serial.println(" C degrees ...... pipe sensor");
// prints temperature from sensor 2

//......................................................................
// TEMPERATURE DIFFERENTIAL
//......................................................................
float diferencialT = temperatureC1 - temperatureC2;
// calculates temperature differential

Serial.print(diferencialT); Serial.println(" grados C diferencial temperatura");
// prints temperature differential

//......................................................................
// RELAY CONTROL
//......................................................................
if( temperatureC2 < temperatureC1 + 05.00 )
// Establishes activation on differential temperature. 05.00 is 5 Celsius degrees.
// Tune this value to suit your needs
{
  digitalWrite(Relay, HIGH);
// Activates relay (normally open), thus deactivates circulation
}

else if( temperatureC1 < temperatureC2 +- 99.00 )
//in case wire connexion is lost
{
  digitalWrite(Relay, HIGH);
// thus will not activate on error read.
}

else
{
  digitalWrite(Relay, LOW);
  Serial.println("........WATER RECIRCULATING........");
// makes relay off, Since NO activates electricity flow
// and thus moves water

}

delay(8220);
// waiting time between reading and action

}


//......................................................................
//......................................................................
// Luis Rodriguez Alonso. February 2015. habitainer@gmail.com
// http://habican.blogspot.com.es/
// published under GNU GENERAL PUBLIC LICENSE
// https://gnu.org/licenses/gpl-3.0.en.html
// this document has been made up with information and code from:
// http://descargas.cetronic.es/TMP36.pdf
// http://tech.yeesiang.com/control-real-devices-using-relay/
// http://arduino.cc/en/pmwiki.php?n=Reference/Else
//......................................................................
//......................................................................


And, could not be otherwise, a small 3D capture of water tank and pipe: